Friday 26 December 2014

Skimmia Japonica - Number 1 plant for December


Skimmia Japonica number one plant for December
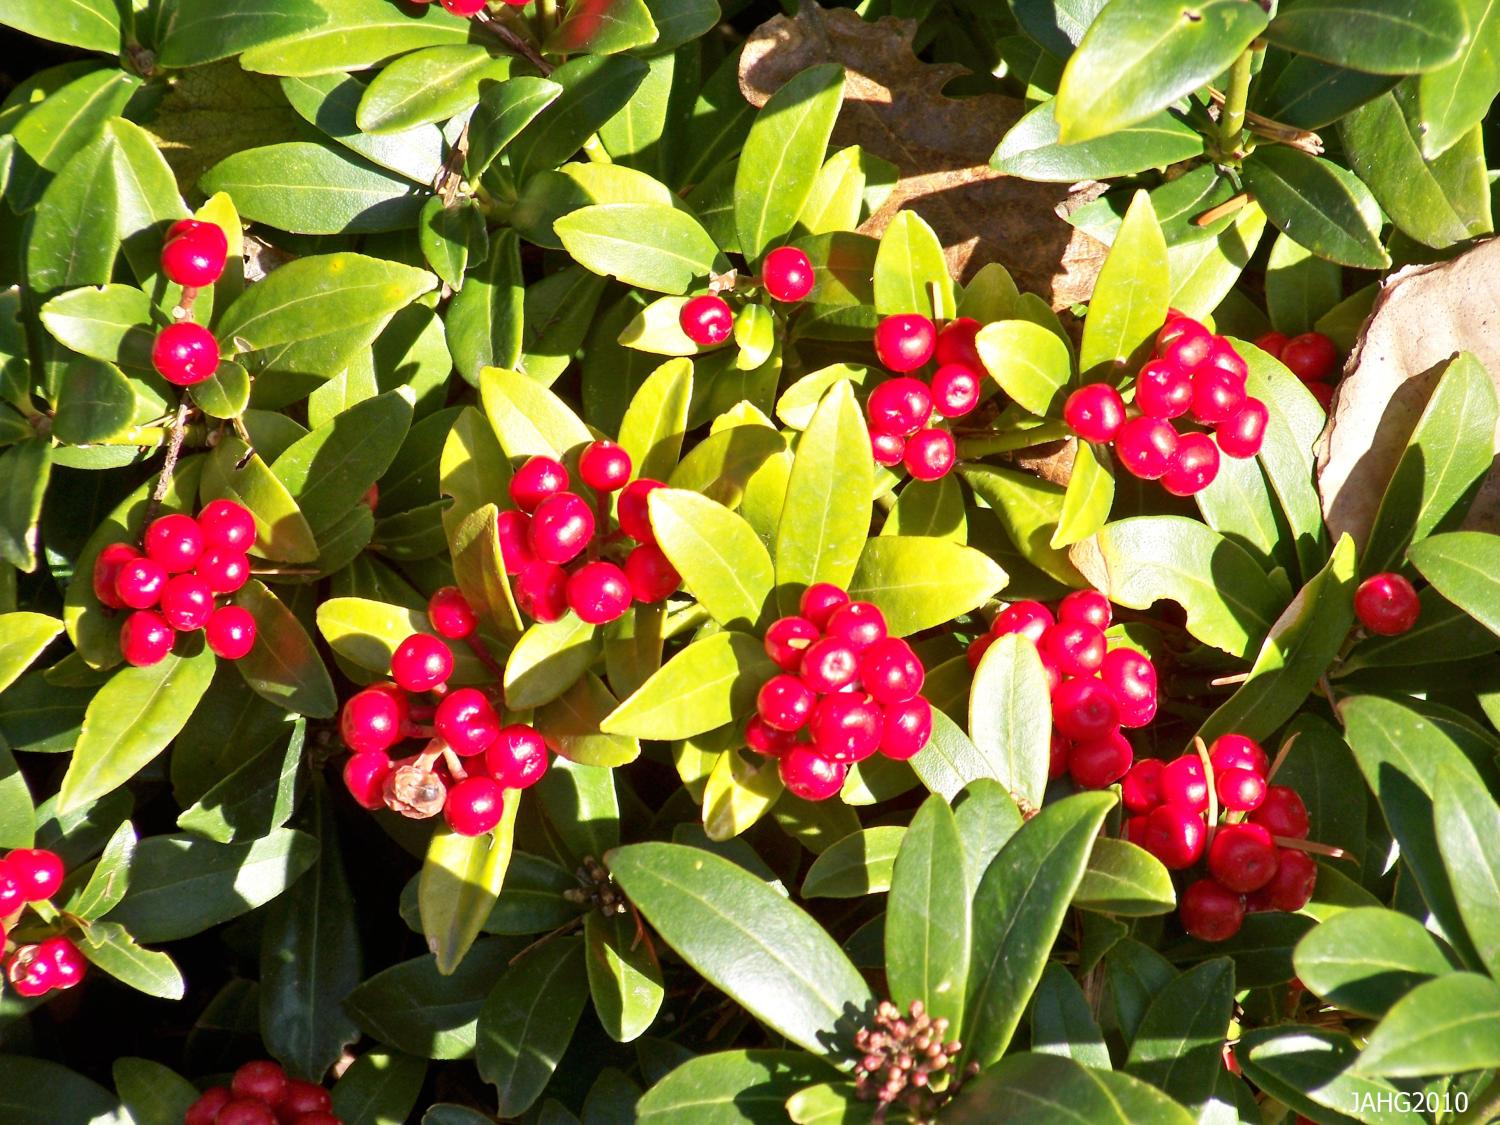
Every year, as Christmas gets closer I am reminded of the charms of this wonderful shrub, Skimmia japonica, so it was an obvious choice for my number 1 garden plant for December. There are loads of varieties, most of which are small or moderately sized bushes, ideal for containers. The one I love in my garden on the other-hand, is huge. I have no idea what variety it is but it is a fabulous addition to the garden. This time of year it is at its best, copious numbers of large red berries with large glossy evergreen leaves. A robust plant that can stand a generous prune in December for any number of festive arrangements for the house. It also has the most heady spicy scent, which gives it an additional Yule Tide tick in the box.

There are 4 species of Skimmia and all are found in Asia; all of the species having attractive berries, aromatic foliage and fragrant flowers.

The Skimmia species is a member of the Rutaceae family which we know better for giving us citrus fruit such as oranges, lemons, limes and Grapefruit.  Other members are as diverse as the bitter herb Rue(Ruta) and Zanthozylum which gives us Sichuan Pepper and Prickly Ash.  Many members of the family are edible and provide us with important fruit, spices and medicinal components. Skimmia is probably is the most important  of the strictly ornamental plants, even the birds don't seem to eat the berries.

 The berries of Skimia japonica are a bright shiny red and are very festive looking at this time of the year.


Skimmia japonica and all its forms are easy plants to grow, I do absolutely nothing with mine, except chop it back to clear the path. Ideally they like fertile rich soil which is slightly acidic but tolerate clay soils quite well, we live in a chalky area and the plant still seems to thrive. They like a site which is well-drained but is well watered during the hot summers as they do not like drought conditions but again mine thrives in a sun scorched south facing garden. They prefer a site which is dappled or is more on the shady side or their leaves will yellow even in a strong winter sun. Mine being in an open sunny site suffers a little from yellowing but I quite like having the mixture of dark glossy green with the brighter yellow sun scorched leaves. As they are evergreen they will do best being in a location which is protected from drying winds especially in the winter season. It also looks stunning with a heavy winter frost.

Use Skimmia japonica as an accent, in a winter garden, for fragrance in the spring, along paths where you brush the aromatic foliage. Their colourful berries are bright winter interest and the foliage is not popular with pests. They work well as foundation plants especially when placed near entrances or windows. Skimmias are also popular in a woodland setting or in borders as they are very low maintenance and will need little care over their long life.

Read more about these wonderful plants here http://namethatplant.wordpress.com/2010/11/29/the-mysterious-skimmia/


Monday 22 December 2014

Christmas Table Centre Piece using what you have at home

Christmas Table Centre Piece - A little bit of nature indoors

christmas table centre piece
Hurrah! I have officially finished work for 2014! Work has been crazy busy for me the last few weeks, so now that I have finished I am left with this surreal end of term feeling. I have got a little bit of time to get Christmassy and get some home-made finishing touches underway. Having a fake tree, I always feel I am missing out on honouring the season and bringing a little bit of nature indoors. So every year I have a stab at creating an indoor arrangement, claiming I am going for the naturalistic look, to hide my obvious lack of flower arranging skills.
 
This year as well as my random flower arrangement, I have made a Christmas table centre piece (design courtesy of Kirsty Allsop). I'm not lucky enough to have any holly in the garden, mind you in my experience the pain of working with it, it isn't worth it anyway. So instead I used some of my Skimmia japonica, a wonderful sturdy shrub with waxy leaves and a generous crop of red berries. It also has a spicy scent and, probably by association, always reminds me of Christmas. I don't feel bad raiding this shrub because there are always loads of berries that don't seem to be touched, so I'm not depriving the local bird population of a meal. Even so I always feel I have to thank the plant. I don't know why but there are some plants, my bay tree being another, that I feel I have to thank when taking material, it must be my inner hippy!  So after making my pleases and thank-yous, I look for something additional to make the framework. Ivy is the perfect plant, with long flexible strands that can be easily woven together and I don't feel the urge to be that grateful and thank it, as it pulls half the rendering off my back wall during collection.
 
After gathering some additional bits and bobs from the craft box and rummaging for unused Christmas decorations, its time to get started.


1. Make a simple hoop shape by weaving the strands of Ivy


2. Weave in the skimma or plants of your choice to give a fuller shape and some colour. I have used some gold coloured florists wire but you could use common or garden green garden wire.
christmas table centre piece


3. Space some clip on candle holders, I always think odd numbers look better. Then, because I like a little bit of extra bling, using acrylic gold paint, highlight the edges of some of the leaves, or use to pick out the veins in the Holly leaves. I decided against the raffia, as it is possibly a bit dodgy with naked flames but opted for a red Christmassy ribbon. I save any ribbons and decorations from chocolates and gift sets of smellies, that I might have been lucky enough to be given, for these sort of things.

4. When you are happy with the arrangement, add candles and a Christmas dinner!

Christmas table centre piece


Saturday 20 December 2014

Double Dove Sensitive Beauty Bars Fulfils Its Promises and more......

dove sensitive beauty bar review
When I got the chance to try the Dove sensitive beauty bar I was thrilled. I have used the original beauty bar over the years and have always found it a great product, so was delighted to have the opportunity to try another Dove product free with Buzz Agent.

It's always very exciting to get samples to try, practically pouncing on the post man as he nervously hands over the parcels as I snatch them out of his hand. This ritual has been observed closely by my seven year old daughter who now shares my excitement, generally claiming what ever booty there is as half hers. So thankfully there were two bars of Dove in my package. So we have both extensively tested the Dove sensitive bar and it does live up to its promises.

We both have sensitive skin, my daughter more so perhaps. Dove cleans and even softens without leaving the tight dry feel of regular soap. I would imagine if you have exceptionally sensitive skin or suffer from eczema this product should still only be used with caution but for mildly sensitive skin it is definitely better than most regular soaps, so worth a try. But one of the other benefits is that it is a bar, it lasts a very long time, you don't get the wastage associated with shower gel escaping down the plug hole and you really only use what you need to use. I have got to say it has rekindled my love for soap in a bar which I haven't really used for years. So apart from being a very gentle cleanser it is also very good value.

Monday 24 November 2014

Rag Rug Hand Hooked Turtle Cushion


rag rug hand hooked turtle cushion
My daughter is seven so only really gets the minimum of homework at the moment, I'm sure this will all change soon enough. So at the moment homework projects still have the allure of novelty and are generally quite fun.

So I wasn't too phased when she announced, 'I have got to make a turtle for Monday'. So after a little thought we thought that she could make a little rag rug turtle. With great excitement she set about working on her design, and looking for old clothes for materials. The turtle consisted of some old curtains of my mums, an old threadbare tea-towel and a pair of my daughters old PE trousers, which incidentally I had managed to shrink. She set to hooking with gusto for all of about ten minutes before deciding that perhaps, she didn't want to part with her turtle and actually perhaps Mum might be better off finishing it! So there began a new project for me instead and an emergency replacement homework turtle made from felt and a big beach pebble (which again she decided she couldn't part with but after a few tears and some gentle persuading she did actually hand in to the teacher).

After finishing my daughter's simple design, I was at a bit of a loss to what to do with it, it wasn't quite wall hanging material and not really any good as a rug, so I mounted it (Just with hot melt glue) on a pre-bought cushion.

There are loads of tutorials on YouTube on rag rugging. It is a really simple craft, which gives you satisfyingly quick results. As crafts go it is also cheap, just using strips of scrap material and some hessian. The rug hooks are also quite cheap at about £12ish.

The little photo montage below shows you how the design grows from a quick sketch to the finished cushion.


Monday 3 November 2014

Hand Printed Gift Wrap


hand printed gist wrap
Never run out of gift wrap again! Making hand-made papers is a real art form but a good cheat is to just print your own.

We always have a roll of lining wall paper for large scale kids craft projects. It's relatively cheap and means the children can really go to town creating their works of art. As it has to withstand the wallpaper paste it is also quite thick and absorbs paint well. It has a slightly fibrous texture which gives it a rustic artisan finish.

To make your own gift wrap just take the length of paper you need and let your imagination go for it! Simple sponge or even potato prints work especially well. Or select complimenting colours and use abstract patterns and designs.

Whatever designs you go for, the results are great and give gifts that real personal touch. Create matching gift tags too and your presents will have a delightful boutique feel, all for the fraction of the cost of shop bought gift wrap. I probably wouldn't have the inclination to make all my Christmas wrap like this but for one off special gifts it gives that additional creative detail.

I used water colour paints for the swirl pattern and poster paints for the potato print stars

Sunday 2 November 2014

Thai Pumkin Soup

thai style pumpkin soup
Ok so we have carved the pumpkins but what to do with the unwanted scraped out flesh? Well although I do like pumpkin pie it is a bit of an acquired taste, so my favourite is a Thai influenced soup.

This warming soup, is a colourful addition to a Halloween party table but also a welcome treat for the grown-ups. Served with warm toasted bread, which you could Halloween-up into mini tombstones, marked up with edible ink. (edible ink pens are fab I just keep finding more and more uses for them!). This soup has got to be one of my favourite recipes and also one of the easiest. If you go easy on the chillies, it also goes down well with the kids because of the natural sweet flavour of the pumpkin. I bulked it out with butternut squash because actually you don't get that much pumpkin flesh out when carving a lantern and also because I have been nurturing the puniest butternut squash you have ever seen nearly all year in the garden. After all the care and attention I have lavished on it, I needed a fitting dish to reflect my efforts.
 
Ingredients
  • 1 tablespoon vegetable oil
  • 25g butter
  • 1 clove garlic, chopped
  • 4 shallots, chopped
  • 2 small fresh red chillies, chopped
  • 1 tablespoon chopped lemongrass
  • Kaffir Lime leaf
  • 500ml chicken stock, I think it's nicer with chicken stock but obviously vegetable stock will do if cooking for veggies.
  • 350ml coconut milk
  • 475g peeled and diced pumpkin or squash (or both as in my case and sweet potatoes would work easily well)
  • 1 bunch fresh basil leaves  

  1. In a medium saucepan, heat oil and butter over low heat. Cook garlic, shallots, chillies and lemon grass until fragrant (be careful not to burn the garlic). Stir in chicken stock, coconut milk and pumpkin; bring to the boil. Add. the Kaffir lime leaf for a more authentic Tai taste. Cook until pumpkin softens. Some websites say cook for about 15 to 20 minutes but I think it's better if cooked slowly for 45minutes or more.
  2. In a blender, blend the soup in batches to a smooth or slightly chunky consistency, whatever you prefer. We like it really smooth. Serve garnished with basil leaves or if you are feeling decadent a swirl of cream or yoghurt.

Wednesday 29 October 2014

Top 5 Easy No Bake Halloween Treats

 I love Halloween! It's a great excuse to eat sweets and have fun, when else do we get the chance to dress up?! Every year we get together with our closest friends and have a little afternoon Halloween party. It won't be quite the same this year as sadly one of our friends passed away earlier in the year, but we are determined to keep up the tradition and I know she would want us to too. However there is one slight problem, my oven has finally given up the ghost and I need some easy no bake Halloween treats for this years party. After scouring the nets here are my top 5 favourites so far:

Number 1 - Vampire Dentures

Fabulously easy toothy treats from The Girl Who Ate Everything. If you buy the chocolate chip cookies, there is absolutely no cooking involved.

All you need is:
Chocolate chip cookies
Red icing (frosting)
Mini marsh-mallows
Slithers of Almonds (for the fangs!)

Apparently they originally won 2nd place by Lori Fillmore in the Nestle 2010 Spooktacular Baking Contest. Thanks for sharing this fab recipe, I may even cheat more and buy ready made icing!


banana ghosts no bake halloween bakesNumber 2 Ghosty Bananas and pumpkin oranges. Thanks Inga Elizondo for this one. I thought I had better put a healthy one up near the top of the chart. This one is simplicity itself. Bananas with chocolate chips, and peeled satsumas with celery stalks.


severed finger no bake halloween treats
Number 3 Finger Food
I nearly didn't pick this one but they are so gruesome I just had to. I wasn't going to pick them because a) I'm not over keen on frankfurters and b) my poor husband lost the ends of two fingers a few years ago and thought these were a bit near the knuckle! Ha ha no pun intended! All you need are frankfurters, ketchup and a little piece of onion for the nails.


no bake halloween treats cheese string brooms
Number 4 Cheese string brooms
Super cute cheese broom sticks. I couldn't find pretzel sticks here in the UK so used twiglets instead, taste yummy but produces stunted brooms, more like feather dusters really, but fun all the same. They are a little bit fiddly to tie with the chives, which is why I am using moms.popsugar.com  picture and not mine!

Number 5 Mini donut pretzel spiders
Another easy treat to assemble. I used the mini donuts from Tesco but any small ring donuts would do but they definitely work better with chocolate dipped ones. Once I had made one I left the children to make the others. We found it quite hard to get the smartest to stick but a tiny spot of icing holds them in place.


To see these and lots more no-bake Halloween treat ideas see my Pinterest board or to read more about why we enjoy Witches, Pumpkins and other Halloween Tat here


Tuesday 28 October 2014

Nerines for Autumn colour - My Number 1 plant for October

nerines for autumn colour

Nerines for Autumn Colour

 
There is nothing like the Nerines for prolonging the colour well into the Autumn. The vibrancy and poise shown by the Nerines is that generally reserved for spring and summer performers.
 
The defiance these magnificent bulbs show holding back the ravishes of Autumn and Winter, as they display their great trumpet blooms. Sturdy upright stems these gorgeous plants from South Africa can pretty much cope with whatever the Autumn weather throws at it.
 
They benefit from being planted in a southerly position on good well draining soil, but mine thrive in a north west facing garden, and bring a welcome splash of colour, in an otherwise now sleepy bed. They quite like to be over crowded, I have got some growing in a well established pot of bamboo, the more they compete with each other for space, the better the show each year. I do feed the ones in the pot, mainly because the bamboo is such a greedy plant, but the flowers are no more or less impressive than those planted directly into the ground.

I do believe they are now available in whites and reds but I have the near native bubble-gum pink variety but I think I will try an add some white ones this year.

Monday 20 October 2014

Repairing my tired and dry hands - E45 Hand Cream Product Review


e45 hand cream product review
This is my first product review through BzzAgent and so far so good I've been very impressed. I do a lot of gardening and we have lots of pets, so there is lots of hand washing going on, which can leave my hands dry and sore. I do use a regular hand cream which works well but often leaves my hands feeling greasy. I am intrigued to see how the E45 creams compare with my usual cream.

I have been using the E45 Intense Recovery hand cream for several days and already seen a noticeable difference. My Hands are definitely smoother, less dry and although a little early to tell my nails seem less flaky and prone to splitting. Quite a light cream, no over greasy residue.

I have also used the E45 Repair and protect overnight hand cream, which was light and readily absorbed into the skin. However for a fragrance free product definitely had a stronger smell than the E45 Intense Recovery cream


Friday 17 October 2014

Gorgeous Glass Fridge Magnets

These simple fridge magnets make use of all those gorgeous gardening magazines and catalogues.

Such a simple idea using your favourite magazine images and floristry glass nuggets.

The optical properties of the glass nuggets naturally magnify the images behind, making eye-catching almost 3-D pictures. The glass nuggets I used were fractionally larger than a 5pence piece but you can get a range of cabochons and glass nuggets specifically for this sort of use from most good craft shops. I went for the floristry nuggets because I like the unique slightly irregular shapes but you may prefer something a little more symmetrical, I also had some in the cupboard!

1. Using a five pence piece I cut out the images from various magazines and comics.
2. Using watered down PVA or Modge Podge and a paint brush lightly paint the face of the image.
3. Place the glass nugget on the face of the image and push down firmly until the image changes from milky white to a clear picture, carefully squeezing out any air bubbles.
4. Wipe away any excess glue
5. When dry fix magnetic sheet cut to shape (again available from good craft shops).

I made these ones for a craft stall I had back in the summer.

 
For another craft idea using old seed catalogues and magazines see my post on making and Autumn Bounty Bowl

Tuesday 7 October 2014

Super Easy Ginger Gread Biscuits

I can't claim any of the recognition for these super easy Gingerbread biscuits. I have tried lots of recipes over the years with varying amounts of success, many of which either didn't cook through properly, or the other extreme, they were  so hard that they would make your brain shake when you took a bite. With all my botched attempts it would be easy to give up, but the thing is I love gingerbread. If you get it right it is such a versatile recipe. More than any other biscuit recipe gingerbread is perfect for creating beautifully decorated morsels, which are as easy on the eye as they are on the palette. However my daughter and I made this batch so they aren't quite up to the harvest festival show, but for us they are very pretty. And for the recipe.......


I stole it from my daughters Brownie Guide manual. I was so happy that after many less than perfect trials with previous recipes, I thought I would share them you.  Great texture, fairly easy to roll out and just enough spice to give them a little kick. Well done to the Girl Guides!.... thank you

Ingredients for really easy gingerbread


100g Soft Margarine
100g Soft Dark Brown Sugar
2 Tablespoons golden syrup
2 teaspoons ground ginger
1 teaspoon mixed spice
200g Self-raising flour
Coloured writing icing for decoration.

  1. Beat together the margarine, sugar and syrup.
  2. Stir in the dry ingredients to make a dough.
  3. Knead very gently, then roll pout to 50mm thick.
  4. Cut into desired shapes.
  5. Bake at 180C or gas mark 4 for 10 to 15 minutes until golden brown.
  6. Leave to cool before having fun decorating them!

Thanks again to the Girl Guiding Association and their book Brownie Adventures
 

Saturday 4 October 2014

Poppy Field, Rag Rug Art

poppy field Rag Rug Art
 
One of my favourite projects this year and one of my first rag rug attempts. Rag Rugging or hooking is one of the most therapeutic crafts I have had a go at. Incredibly simple, once you have mastered
just one or two techniques you can start to make some beautiful pieces. As you use mainly scraps of fabric it's a great way of recycling and it means it's one of the cheaper crafts you can take up. This picture was made from mainly old pillow cases and pyjamas, although I did by the ribbons for the poppy heads. I love poppies and my inspiration comes from a gorgeous field that never fails to perform each year with the most fabulous display, high up on the South Downs in West Sussex.


Tuesday 30 September 2014

Apple and Sultana Drop Scones


apple and sultana drop scones
I don't know what it is that makes children so hungry after school, but the truth is they are generally ravenous when they get home. Consequently I am always looking for a snack that will satisfy them, act as a bit of treat but not ruin the chances of them being hungry enough to eat all the vegetables I live in hope that they will consume at dinner.

As a child my mum would cook the classic drop scones (also called Scotch pancakes) as a treat every once in a while. I remember the warm stack of mini pancakes would disappear in minutes, there never seemed to be enough. Because of their Moorish nature, and quite frankly my lack of will power, I sought to see what could be done to perhaps make them slightly healthier.

So here is my take on the classic drop scone. So essentially the main difference is I have added chopped dried apple pieces and sultanas, ok so lots of sugar here but its natural sugar and has the benefits of fibre and other nutrients. Another way to increase the fibre content was to substitute some of the flour with wholemeal flour, only about a fifth so it's not too dry (or noticeable). I actual replaced the caster sugar with granulated Stevia (a natural sugar alternative which has all the sweetness without the calories and doesn't give you the sugar crash of regular sugar). I also used rice bran oil, which as all the health benefits of olive oil, plus it has a higher smoking point so more of the nutrients are preserved, it also has more vitamin e.

Ingredients
  • 100g  white self-raising flour
  • 25g wholemeal self-raising flour           
  • 2 tsp caster sugar  (I used Stevia instead to reduce the sugar content)          
  • 1 egg, beaten (I had to use two but that's because I was using our bantam eggs) 
  • 4 tbsp Rice bran oil           
  • 150 ml (5 fl oz) semi-skimmed milk or water 
  • Small handful sultanas
  • Small handful dried apple pieces
  • 1/2 tap cinnamon (optional)          
Combine the flour, sugar (Stevia) and cinnamon if using. Make a well in the middle and add the beaten egg and milk/water mix to a smooth batter. Stir in the fruit.
 
Heat the oil in a heavy based frying pan. Add the batter in small dollops, may be four or five to the pan. When air bubbles start to appear in the batter its time to flip them over using a spatula. Once lightly golden on both sides remove and set aside. Best eaten while still warm. Now if you manage not to eat them all, they do freeze well. Freeze in small after school portions, they can be popped in the microwave frozen as needed (about 30 seconds). I have got to confess, I had to make two batches because I kept eating them as I was cooking them and there wasn't enough for the photo!
Seo by http://seo.uk.net/

Sunday 28 September 2014

Autumn Bounty Bowl


easy kids craft decoupage bowl, autumn decoration

Decoupage Autumn Bounty Bowl


Make the most of your Autumn bounty and make a gorgeous display with this dead easy decoupage bowl.

I can spend hours and hours going through gardening seed catalogues. The gorgeous vibrant colours, the anticipation they bring as you look forward to the new season of colour. I hate to throw them away after I have made any selections, so we are always looking for new ways to use them. One creation was a decoupage shoebox for the copious amount of hair bands we seem to collect.

So inspired by the Autumn harvest we looked for something else to decorate. My daughter and I like to craft together, so projects have to be fairly simple, with quick results or attention spans tend to wane. Decoupage is a great kids craft, it fulfils the messy aspect required by children, and getting fairly good results from little skill or from tiny hands means it's a great craft to help build confidence and creativity. To make the Autumnal Bounty Bowl you will need:

1 balloon
Bowl for keeping balloon steady
Watered down PVA
Scissors
Magazines or catalogues
Marker pen
Gold acrylic paint
Paint brush

Instructions

1.Taking a balloon and using the traditional paper Mache technique of laying strips of newspaper
easy kids craft decoupage bowl, autumn display
over the upturned balloon (use a bowl to steady it), brush over each strip with PVA glue, I guess you could use the wonderful modge podge for this too, but I had just PVA to hand which I slightly watered down.

2. Once two or three layers of newspaper cover half the balloon, it's time to select the images you want to use.

easy kids craft decoupage bowl, recycling cataloguesSingle colour themes look really effective but I chose a multi-coloured range of images with different shapes and textures to reflect the colourful bounty of Autumn.

When you have got the coverage you like, leave to dry at least overnight. The more generous you are with PVA the more rigid your bowl will be.easy kids craft decoupage bowl autumn crasfting ideas

3. Once dry and hardened, pop the balloon and carefully peel it away from the shell of your bowl. My daughter particularly enjoyed this bit. You will need to trim the edge of the bowl to give a pleasing finish.

You could go for a regular straight edge but is actually quite tricky and a shaped edge can look very effective.


4. Using your marker pen draw the shape of your easy kids craft decoupage bowl, autumn display ideas
desired bowl edge. Use sharp scissors cut your bowl edge.

5. Once you are happy with the border of your bowl, paint the inside with a tough acrylic paint and leave to dry. easy kids craft decoupage bowl
To give the bowl a glossier finish, give a light coat of spray varnish inside and out and leave to dry thoroughly.easy kids craft decoupage bowl, crafts to do at home


04a393512910785ef72c1e7b7497fd805d210d78cbab100229


Friday 26 September 2014

Blogloving, Sharing is Caring


Ooh just signed up to join the lovely people at Bloglovin. Really supportive Blogging Community Follow my blog with Bloglovin
 

Monday 22 September 2014

My Number 1 Garden Plant for September - Heliniums


My Number 1 Garden Plant for September - Heliniums.

As the summer starts to fade so to do some of the more blousey blooms of the hot months. However I love the garden as it slides into Autumn. Daisy like plants come into their own bringing with them deep warm colours. So my Number 1 plant for September was a hard choice, as so many gorgeous Autumn daisy like plants seem to have caught my attention this year.

I have narrowed it down to the  Heleniums. Heleniums are members of the Aster family (Asteraceae). The species from which the garden forms of Helenium have been bred grow wild in North America.

According to www.helenium.net  "Heleniums are much under-rated hardy perennial garden plants. They are a mainstay of the autumn border but are so often overlooked by gardeners, garden journalists and growers. Why can this be? They are hardy, colourful, easy to grow, tolerate difficult growing conditions, provide months of colour, are attractive to pollinating insects and unaffected by most pests and diseases."

Having a small garden every plant counts, so choosing plants to extend the season with little effort are well worth investing in. Heleniums have everything I look for in a plant, they provide deep warm colour, with strong architectural shape and are perfect for a cottage garden border. Easy to grow and suited to a wide range of garden conditions, however they are often found in very moist or even wet conditions making them ideal for our British climate.

They are at their best right now so pop to the garden centre and give your garden a colour boost!


Sunday 21 September 2014

Keeping Chickens as Pets


keeping chickens as pets

 Keeping Chickens As Pets

I don't know why but a life long ambition of mine was always to keep chickens as pets. I just love everything about them, their quirky personalities, the noises they make, for some reason they just make me happy when I'm with them. So as my 40th birthday present my husband finally gave in and we went and collected Alice, Martha and Heidi.


keeping pet chickens
Peacock, Bonnie & Bluebell
Since my girls came and joined the family they have proved to be everything and more, that I'd hoped them to be. As a novice chicken keeper, I chose the comical Pekin Bantam, which are a great breed to start with. A small bird, with short squat body, pom pom tail and fluffy feathery trousers. We are now on our second set of girls, Bluebell, Bonnie and Peacock. Every bird has a distinctly different personality. Bluebell, soft cuddly and affectionate, Peacock, the Barbie doll bird, a little bit ditsy but truly beautiful, and then Bonnie, a little bit grumpy and a little bit of Mrs Mangle about her, for those that remember the matriarch from Ramsey Street.

So what makes Chickens good pets?

back yard chickens eggs
Friends with benefits
 You get all the love and interaction of a regular small pet but of course you get the eggs, just like friends with benefits! I'm often asked how can you keep chickens and have a pretty garden. Well my garden is far from perfect but I grow a huge range of edible and decorative plants in a small space and still let my girls have free range of the garden.


Chickens - great pets for the garden

gardening and chicken keeping
My Garden, not too shabby, although we have chickens
They do love to scratch for grubs and do eat lots of different vegetation but it's a balance. They keep the creepy crawlies that can harm the garden down and in return some of my plants have doily like leaves. Now I don't know about you, but I'd rather have a few doily leaves, knowing that they will be turned into delicious fresh eggs, rather than providing food for slugs, and the loss is tiny and unnoticeable across the whole garden. Perkins are also the one breed that are least likely to wreck your garden, their fluffy feet mean that they don't like getting muddy feet and consequently don't scratch up the grass. The only adjustment I have had to make to the garden is to edge the borders. The girls love where boarder meets lawn and will extend the boundary given the chance. So to keep things neat, I have edged the boards with log roll, it keeps the lawn edges crisp and gives the girls handy garden length perches. They also keep the lawn length down, together with help from the guinea-pigs, I have only had to cut the grass twice so far this year. Obviously they help keep the nutrients in the soil tip top, chicken poop is a fertilizer second to none, helping me grow a wide range of fruit and veg in a much smaller space than normally possible. Also reduced chemical fertilizers and pesticides means gardening with a clearer conscious.

chickens make great pets
A quick after school cuddle with Peacock

Chickens as family pets

Perkins are incredibly friendly, they will follow you round the garden, they genuinely want to be where ever you are. So whether you are working in the borders or relaxing reading up on the decking, they will always want to be within a few feet of you. They adore my daughter, as soon as they hear her voice, they will charge the length of the garden, doing their fly running, galloping wildly, while madly flapping their wings for extra oomph! I love the little tap on the back door while I'm cooking dinner, just their little reminder to make sure they get their dinner too.


Saturday 13 September 2014

Sanity Saving Crock-Pot Ready Meals

crock-pot freezer ready meals

How a trip to Essex has given me back an hour everyday and saved me some sanity?

A late summer trip to see a very dear friend of mine, who had recently moved back home, led me to a huge time saving practice for the kitchen. She introduced me to the art of pre-prepared freezer meals that you pop straight into your crock-pot ready to give you warming nutritious meals at the end of a busy day.
 
Her actual words were "I thought you would have known all about crock-pot ready meals". I let the annoyance, that she had discovered this wonderful kitchen art before me, slide and then raided her Pinterest boards when I got home.
 
And so after 4 hours (that includes the shopping time) I have 44 meals sitting waiting to be devoured, and all I have got to do is pop them in the crock-pot and maybe do some extra fresh veggies on the day, if I'm feeling all righteous and Super Mum.
 
We in England call them slow-cookers, but I have adopted the Americanism 'Crock-pot' because 'crock-pot' actually sounds quicker and as this has probably bought me an extra hour each working day, I think it's appropriate.
 
So that's the time saving, lets look at the cost saving. Total ingredients for 44 meals cost approximately £39, giving me a portion cost of just short of 90p, throw in some rice and veggies and stuff and you are probably looking at £1 per portion. Now in this day and age, I don't think that is bad, I used to budget for a £1 a portion fifteen years ago when I first moved in with my boyfriend (He hadn't earned his promotion of husband at that point). So time and money saving, together with trying some new recipes means, I think this experiment is going to be a winner.
 
So what did we cook?
 
Sweet Teriyaki Chicken
1 cup soy sauce
1 cup sugar
1tsp garlic salt
1/2 an onion
1 1/2lb chicken breasts

 
Chicken Curry (which I can't wait to try, loads of Mangoes and sweet potatoes)
3tbls flour
4tbls Curry powder
2lbs Chicken
2 cups set potatoes
2 cups baby carrots
2 cans Mango
1 Cup of Onion
2 cloves garlic (minced)
2 cups good chicken stock
 
Orange Chicken
2 cups carrots
2cups bell peppers
1lb chicken
3 cloves of minced garlic
1/2tsp pepper
8oz orange juice
 
Beef Stroganoff
2lbs stewing beef
2cans of condensed mushroom soup
1cup onions
2tbls Worcestershire sauce
1/2cup water
2 cloves minced garlic
1cup chopped mushrooms
 
And a spicy chicken thing I forgot to note the name of (sorry)
2lb chicken breast diced
1/8tsp cayenne pepper
1tsp paprika
1/2tsp ground ginger
3 sweet potatoes
1 onion chopped
1 cup apricot preserve
3tbls cider vinegar
1tbls soy sauce
1 cup chicken stock
2tbls cornflour
 
 
There are loads of great sites with crock-pot ready meals but the ones I have use so far are can be found on my Pinterest board slow Cooker.

So thanks to my dear friend from Essex, for giving me the extra hour in the day I have been looking for!


Thursday 27 March 2014

My Recipe for 'healthier' Chilli Dipping sauce without sugar


lower sugar chili dipping sauce

I love chilli dipping sauce, the sticky sweetness with the hit of the chili is delicious but I'm always conscious of the sugar content, try my sugar free alternative. Well ok its not quite without any sugar but a much healthier alternative with a low GI so you don't get the sugar crash that's often associated with regular sugar.

Regular chili sauce requires quite a lot of sugar which is simmered down to give a nice rich syrupy consistency to the sauce but that comes with all the negative attributes associated with sugar. However it can be made inter a healthier condiment by substituting the sugar for Agave syrup or natural fruit extracts like sweet freedom. Sweet freedom has 25% less calories than ordinary sugar and is already syrupy in consistency. You also use 25% less gram for gram than sugar, is tolerated by Diabetics (as part of a healthy diet) and has a low GL (Glycaemic load). Agave syrup works in much the same way but is made from the Agave cactus rather than from fruit.

Now for the recipe......
I don't very often measure anything out so please feel free to adjust the quantities to taste.
1 cup of white wine vinegar
2 cups of water
2 cloves of garlic finely chopped
2 small chillies (seeds out if you want a milder flavour)
300 grams sweet freedom

place in pan and bring to a boil. then simmer gently for 10mins. If you want a thicker sauce you could add some cornflower mixed with a little water to make a paste. Use as a straight forward dipping sauce or use as a marinade for prawns or chicken, great with noodles.